Gabriella Diaz
3D Environment and Look Development

Look Development
Snowy Volkswagon
Texture Artist
January 2026
This Volkswagen van Asset immediately called me back to the imagery of Jon Krakauer's novel "Into the Wild," A book which covers the disappearance and passing of Chris McCandless. The mystery and conspiracy surrounding that case, is what inspired the texturing direction of this van.
Responsible for texturing

Software used: Maya 2024, Adobe Substance Painter
Process and Documentation

Reference Images
Although I wanted to take a more stylistic approach, I still referenced multiple real world images to capture the snowy, abandoned look. I specifically wanted you to question how recent this van had been left with the markings on the van/glass.
While I textured I continuously asked myself how the snow should land on this vehicle. I took care to cover every lifted surface with snow or the impression of it.
Texturing to Render Workflow
For this project I began by setting up my Master file in Maya. This would have the Look Development rig ready to go, as well as all my shaders set up with their correct file paths.
As I started texturing, I was easily able to check how my textures were going to look in the final render, just by reloading my maps. The first image shows my base color ideation already in format.
With that set, I then set up my low poly and color ID meshes for export. This workflow allowed me to easily mask large chunks of color, which came unexpectedly handy for such a stylistic approach.
Painterly as this van is, I made sure to work as non-destructively as possible. With all the masks I had been using, I was able to take full control of color variation even after I had placed down the brushstrokes. I could achieve better color harmony just by adjusting the hue and saturation of my masked fill layers.
The largest challenge of this piece came with the scale and the snowy weather effect. The quantity and varying size of meshes posed a problem for the height displacement I was enacting. What had worked on top of the van, didn't on those smaller pieces, so I opted for a mix; actual heightened snow, and painted on snow that gave the effect of it landing there. Not only did this speed up my process, but further enhanced the aesthetic I was going for.


Texture Artist
Mosaic Teapot
January 2026
For this project, I wanted to base my idea in reality, and design the teapot as it was actively living; in progress. Almost done! But not quite. The idea of someone actively decorating this teapot is what drove the direction of my texturing.
Responsible for texturing

Software used: Maya 2024, Adobe Substance Painter
Process and Documentation
Reference Images
Taking a realistic approach, I collected reference images of finished, and unfinished mosaic teapots and pulled specific details from each. I was surprised to find that silver teapots are often adorned with tile. This provided many great images to work with. During my research I explored how these pots are made in real life, and I tried to imitate that process through my texture work.
I wanted my design to be fun and remind me of a much warmer season, one that always inspires me to do my own crafting!


Mosaic the Teapot with me!
Anyone who loves crafting as I do, knows their TRUE love is discovering new materials. Whether it’s something as simple as crayon drawings, or as intricate as mosaic tiling.
I was aiming to capture that messiness and natural strive artists have for perfection. To achieve this, I used a variety of generators that helped mimic real life grunge and grout for the base of the teapot.
The tiling itself is all done through height and displacement. These tiles were "placed" by hand and given slight color/roughness variation to imitate imperfection.
Finally, the top layer of grout was achieved by painting on top of all my layers. This was the most fun as I got to make chaotic brush strokes and leave imperfect, perfect markings behind.

Texture/Groom Artist
Doctor-Buddy Stuffie!
February 2026
Tasked with designing a stuffed animal, I became remined of my very own at home; tattered and covered in bandaids. I thought it would be intersting to design a cute stuffie that was just as much a doct ors paitient as you were!
Responsible for texturing and groom

Software used: Maya 2024, Adobe Substance Painter
Process and Documentation
Reference Images
Since this concept was based on my very own stuffed animals I had once dragged to the doctor's office, I let them dictate the materials I would be using!
With the different materials and textures I wanted, I made sure to gather tons of reference from different angles. This also helped me decide which parts of this plushie would and wouldn't be groom.
.png)

Using Interactive Groom ( + close ups )
As my introduction to Interactive Groom, I spent a lot of time experimenting. Thick hairs would look rough but the thin hair required a density would get dark and muddy. There was a constant push and pull between different descriptions and HDRIs until I found a balance that worked. With those challenges at the forefront, I kept my other textures relativley simple, hoping to emphasize my cutesy design.
Texture/Groom Artist
Howl 3D Concept
February 2026
Turning Iconic 2D characters into 3D concepts is often an uphill battle, and for my first time trying XGEN groom, I somehow decided I would grab my climbing gear and try! This project was a fun way to learn long grooming and stregthen my XGEN Interactive skills.
Responsible for texturing and groom
Howl Pendragon from Howl's Moving Castle (2004)

Software used: Maya 2024, Adobe Substance Painter
Process and Documentation
Reference Images
Since I was recreating Howl's Raven form, I pulled a lot of reference from birds, wolfcut hairstyles, and cosplay.
Those images in particular helped me decide what would be practical, and what would be implied. For example, I eventually settled on making the feathers on his face actual featehrs rather than makeup.


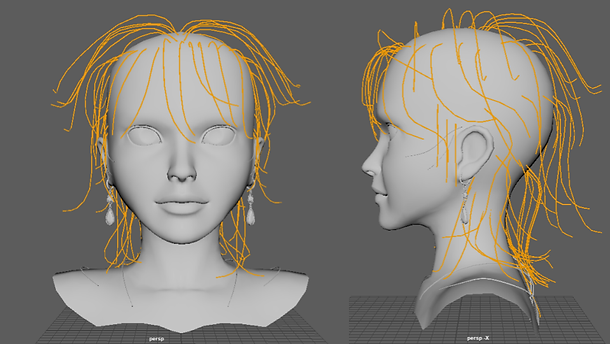
XGEN Guide Workflow
Howl's hair is very stylized in his raven form, and to capture that same design, I heavily relied on my sculpted guides.
Starting from curves allowed me to have better control of the overall shape so I tried to do most of the heavy lifting early on in this stage. Having all my guides layered also helped with achiveing that choppy wolf-cut look.
Once I was happy with the guides, I took my time painting and repainting various scalp maps to achieve the desired look. Tackling the hair made the eyebrows and eyelashes a much easier process, and once I was happy with the general look, I just had fun! I was constantly changing the applied modifiers to push and pull the final outcome. This was also where I applied the Interactive groom on his skin to create that feathered look.